Networking is one of the keys to running a successful business. Meeting up with the right people, introducing your products and getting your market excited about CTi is all a part of getting in front of the right individuals. A great resource to help you in the endeavor is BNI International Business Networking. BNI has chapters around the world and specializes in arranging networking meetings between business owners in select areas. To find out more about BNI, click here or to find out if there is a chapter in your area, click here.
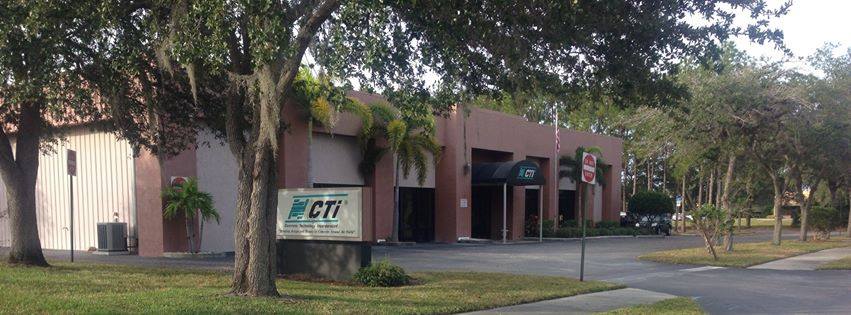
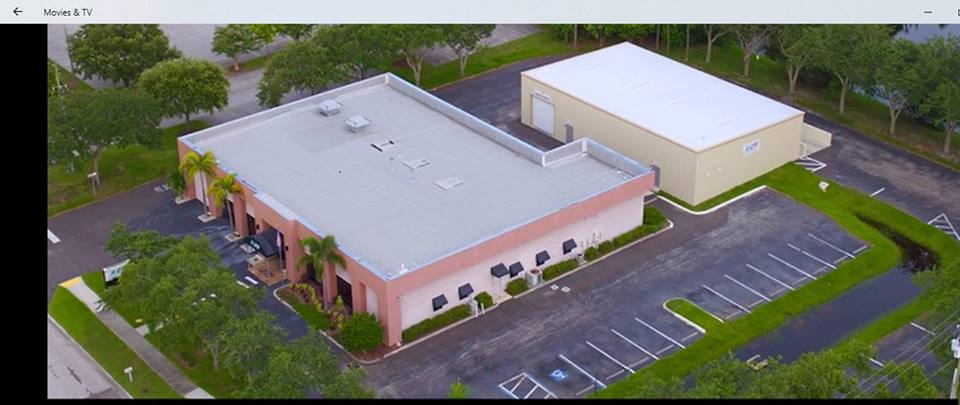
Came across this photo, circa 1992 showing the original CTi headquarters. The next couple of photos are today’s headquarters and training center for Concrete Technology.
What a ride it’s been, we owe our success to all of our Dealers, Distributors and employees who make it happen everyday.
Thank You for everything you guys do, the best is yet to come!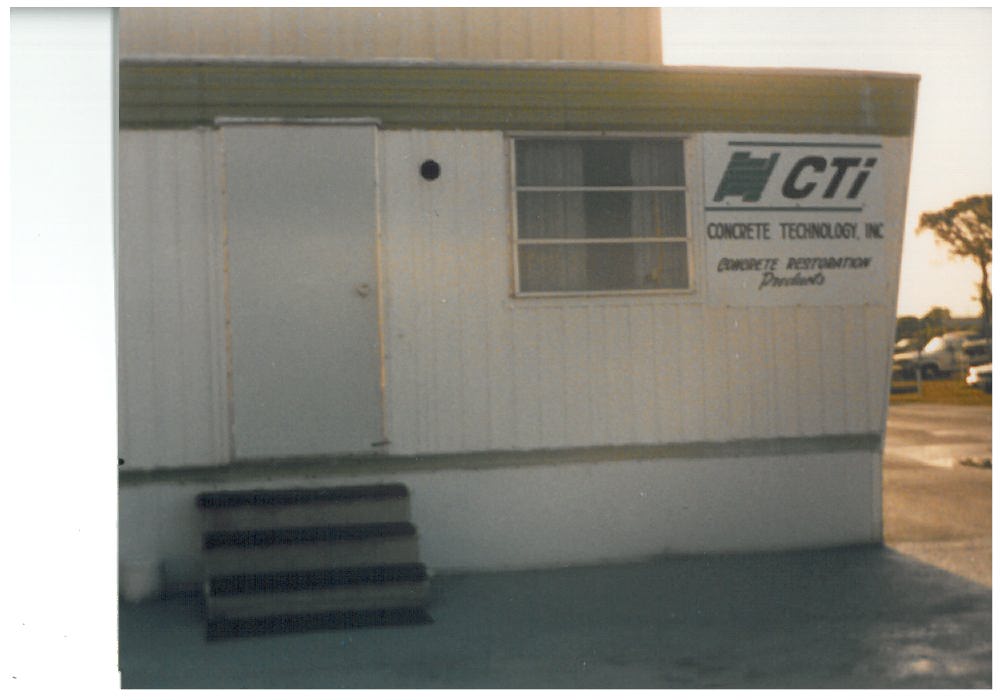
A customer needs to trust you prior to buying your product. We mention in our marketing seminar that the purchasing decision rests on two main questions being answered:
1) Why do I want to buy this particular product?
2) Why do I want to buy this product from your company?
Trust goes a long way in answering both these questions, so how do you go about establishing trust with your customer? First, it comes from longevity, both perceived and real. A customer can find a level of trust when you tell him you’ve been installing the product for a number of years. If this is not the case, you can change the customer’s perception is a couple of different ways. Consistent advertising can change a customer’s perception on how long a business has been around. Customer who consistently see you advertisement over a period of months will see you as an established company. The confidence you exude when you’re speaking with the customer is another way of building their confidence. While newer Dealers may find this difficult (an I’ve even seen some seasoned Dealers who have an issue with this), have a demeanor that puts the customer at ease because they sense you want to solve their problems will lead to more confidence on the customer’s end. How the customer is treated throughout the sales cycle is also another way of building confidence. A professionally done advertising message, a phone that is answered “Good afternoon, Concrete Technology, how may I help you?” vs. “Hello?” are just a couple of ways to build the customer’s confidence. Being on time and delivering on deadlines are other ways to build confidence. If you say you’re going to be at the customer’s house on Thursday at 5:30, do everything you can to be on time; if you’re running late, call the customer to let them know. If you tell the customer that; weather permitting, your crew will be on the job site a week from Thursday and should be finished by Friday afternoon, meet those deadlines. If you don’t think you can meet the timeline, don’t promise the customer.
A customer’s trust will not only lead to more sales, it also leads to more referrals as the customer confidently tells their friends and relatives to give your company a try.
Twenty-seven years ago, our owner and founder, Kevin Rosenberger, was a hard working pool deck applicator. In those days, applications only came with a one-year warranty and, as short as it was, applicators were still deluged with warranty work! Kevin decided there had to be a better way.
He started experimenting with unique materials and formulations. In time, his experiments led to a mixture of Acrylic Polymers and Portland cement. That was the birth of what has come to be known as CTi’s “Hallmark System.” Kevin continued to develop his new product and the industry (small by today’s standards) was stunned when CTi offered the industry’s first Ten Year Warranty!
Kevin’s efforts pioneered Acrylic Cement and, as a result, both CTi and the Concrete Coating Industry literally exploded over the next few years; so much so that CTi earned the coveted INC-500 Award in 1997, after just six years in business.
Today, CTi is recognized as the world-wide industry leader of the Concrete Coating Industry, with a network of over 700 CTi Dealers in 22-countries having installed over 100-Million square feet of Acrylic Cement products. With its modern manufacturing plant and World Headquarters both located in Largo, Florida, CTi enjoys a reputation as the most successful company of its kind on the planet. Ask any CTi Dealer why that is and their response will most likely be, “Because of CTi’s dedication to my success.”
Kevin made the decision early on to offer CTi products only through a network of factory-trained CTi Dealerships, tying the success of his company to the success of his Dealers. His vision was to award CTi Dealerships to those folks looking to create a new lifestyle for themselves and their families, using a Franchise Model but requiring no franchise fees or royalties. Every CTi Dealer is an independent business person, backed by over sixteen years of CTi-developed Marketing and Sales Tools, Initial and Advanced Training Seminars, “Tech-Tip” Videos covering every aspect of installing CTi products, and the support of a Technical Support Team available to CTi Dealers 24/7.
The old cliché, “you’re in business for yourself but not by yourself,” has never been more accurate than it is when describing the world-wide family of CTi Dealers.
That depends on several factors… Let me explain.
Traffic: If you have a job on a driveway and the customers have kids and both kids have their own cars as well as mom and dad having 2 cars, I would upgrade to the 200 or 6000. By the same token, commercial driveways should automatically get 200 or 6000.
Weather: If it”s the rainy season where the chances of showers are strong and you have to get a coat of sealer on the job or stand a chance of losing it or it getting damaged, I would drop back and use the 150/155. If the 150 or 155 gets wet before it’s totally cured it will haze white. The second coat of 150 or 155 will 99% of the time pull the haze out and it will look great. However, if the 200 or 6000 gets wet before it is cured it too will haze up white but you will have to grind the job down to get it off and then start over.
Chemicals: If you’re selling a job and there are lots of solvents or chemicals being used, you will need to upgrade from 150 or 155 to 200 or 6000. For example automotive repair centers: Brake fluid, transmission fluid, battery acid, etc. And, keep in mind that some folks still do heavy repairs on their own cars at home. They need 200 or 6000 as well.
So here are some examples where you might want to upgrade from 150/155 to 200 or 6000:
1. Heavy traffic
2. Lots of chemicals
3. Customer looking for a lot of sheen
Here are some examples when you might have to step down from 200 or 6000 and use 150/155 on outside jobs.
1. Strong chance of rain getting on the job before 200 is cured.
2. Have to put sealer on late evening and they”re expecting dew.
3. Foggy outside.
Keep in mind you can NOT put 200 or 6000 over 150 or 155 or 150/155 over 200/6000 they are stand alone sealers.
So you just received all your materials and ready to start coating everything in sight. Before you do something to mother in laws driveway that you may regret for the rest of your life, you might want to consider making a few sample boards first. In dealer training Chuck makes it very clear that it is important to make sample boards for several reasons.
First, you need to get all your equipment dialed in and adjusted properly, as well as getting used to how it all feels in your hands. By adjusting your equipment and playing around a little bit, you’ll become more comfortable and you’ll start to learn how to achieve the perfect results your looking for.
Second, you don’t want to waste a significant amount of product on a project without having some idea of what you are doing. Worse case scenario, you might end up having to grind it all off because it didn’t turn out the way you wanted or didn’t end up as a good example of your capabilities.
Before all your materials arrive, you should review all of your instructional DVD’s located in your welcome aboard package. Be sure to view the segment labeled “Doing the job right” There is also a video called “Assembling your equipment” located in the “Product application section” of the dealer website that should be viewed prior to getting started. Once you have organized all your materials, and reviewed the videos, then it’s time to get started making some basic sample boards.
We are often asked, “what’s the best material to use for sample boards?” You can use 1/4″or 3/8″ plywood, Luan, Masonite , Hardy-back board or Dura-rock. Any of these materials will work fine. Luan is light, durable, and inexpensive. On your first sample boards you may want to just use entire 4’ by 8’ ft. sheets of plywood. With this size you will be able to work on your skimming, spraying, and taping techniques. If you don’t like the way they turn out the first time, you can skim right back over them again and start over.
After you have practiced on the 4’ by 8’ sheets a few times and have gotten a little more comfortable with the product then you might want to consider making some smaller sample boards usually 2’x 2’. This size is light, easy to carry around, and can easily fit in a small car used for sales calls. Architects and designers also prefer the more convenient smaller sample boards.
Making sample boards requires the same procedures as doing a real job except for the prep of the surface. On a real job we would either acid-etch and power wash or mechanically abrade the surface in order to properly prep the concrete. Because sample boards are usually made of wood we recommend just skim coating them twice.
We suggest making at least 6 to 10 sample boards at one time. It doesn’t make sense to mix products and get your tools and equipment dirty for only 1 sample board. We usually start by mixing a ½ bucket of 105 grout at skim consistency. For half a bucket we mix ½ a bag of 105 grout and 2 ½ to 3 qts. 112 modifier. We mix the grout with our ½” drill and square mixing paddle. Once the grout has been mixed, we then pour it out equally in to 5 or 6 smaller buckets. We then add approximately ¼ cup of 190 colorant to each of the smaller buckets making each bucket a different color so you can skim different boards in different colors. Next we skim coat each of our sample boards. After the first skim coat has cured, we lightly flat scrape or rub brick the surface, brush or blow it off and skim again. Allow the skimmed sample boards to cure out completely. Cure time will depend on temperature, humidity, air movement, and direct sunlight. Cure time could be as little as 1 hour at 85 degrees outside in direct sun light or over night if inside with cooler conditions.
Once the skim coat has fully cured, again flat scrape or rub brick as needed to remove any sling from the troweling and then brush and blow off. Any excess dust. At this point you can tape out the desired patterns using filament tape. You can do bricks, stones, tiles, etc.
After you have applied the filament tape for the patterns you will have to decide what type of texture you are going to apply over the tape, either a spray texture or a hand troweled stone texture. For either the spray or stone troweled texture, we will need to mix up another ½ bucket of 105 grout. This time however, we will make the mix a little bit thicker. We’ll mix ½ a bag of 105 grout with 2 ½ qts. of 112 modifier. Be sure to mix thoroughly so that there are no lumps that might clog your hopper gun. Use a margin trowel to scrape the inside of the bucket when you mix to insure consistency. Once the grout is mixed, pour it equally into 5 or 6 separate buckets and then add ¼ cup of 190 colorant to each bucket making them all different colors. Now you have the ability to spray multiple combinations of colors on multiple boards. We suggest shooting the boards with lighter main spray colors first. Remember, when you spray your highlights to start with the lightest color and then work your way to the darkest. You will have to either clean your gun or switch guns to go back to your original main spray color. Refer to the “Doing the job right video” if this is unclear. Once you have sprayed and highlighted your boards, allow them to cure out thoroughly. Once cured, you can flat scrape, broom, and blow them off. At this point they should be ready to seal. For most Hallmark samples 2 coats of 150 or 155 sealer can be applied. You can use other CTI sealers such as Rapid Armor, EZ Armor, Aquathane 6000, or Pro-Seal 200 as well.
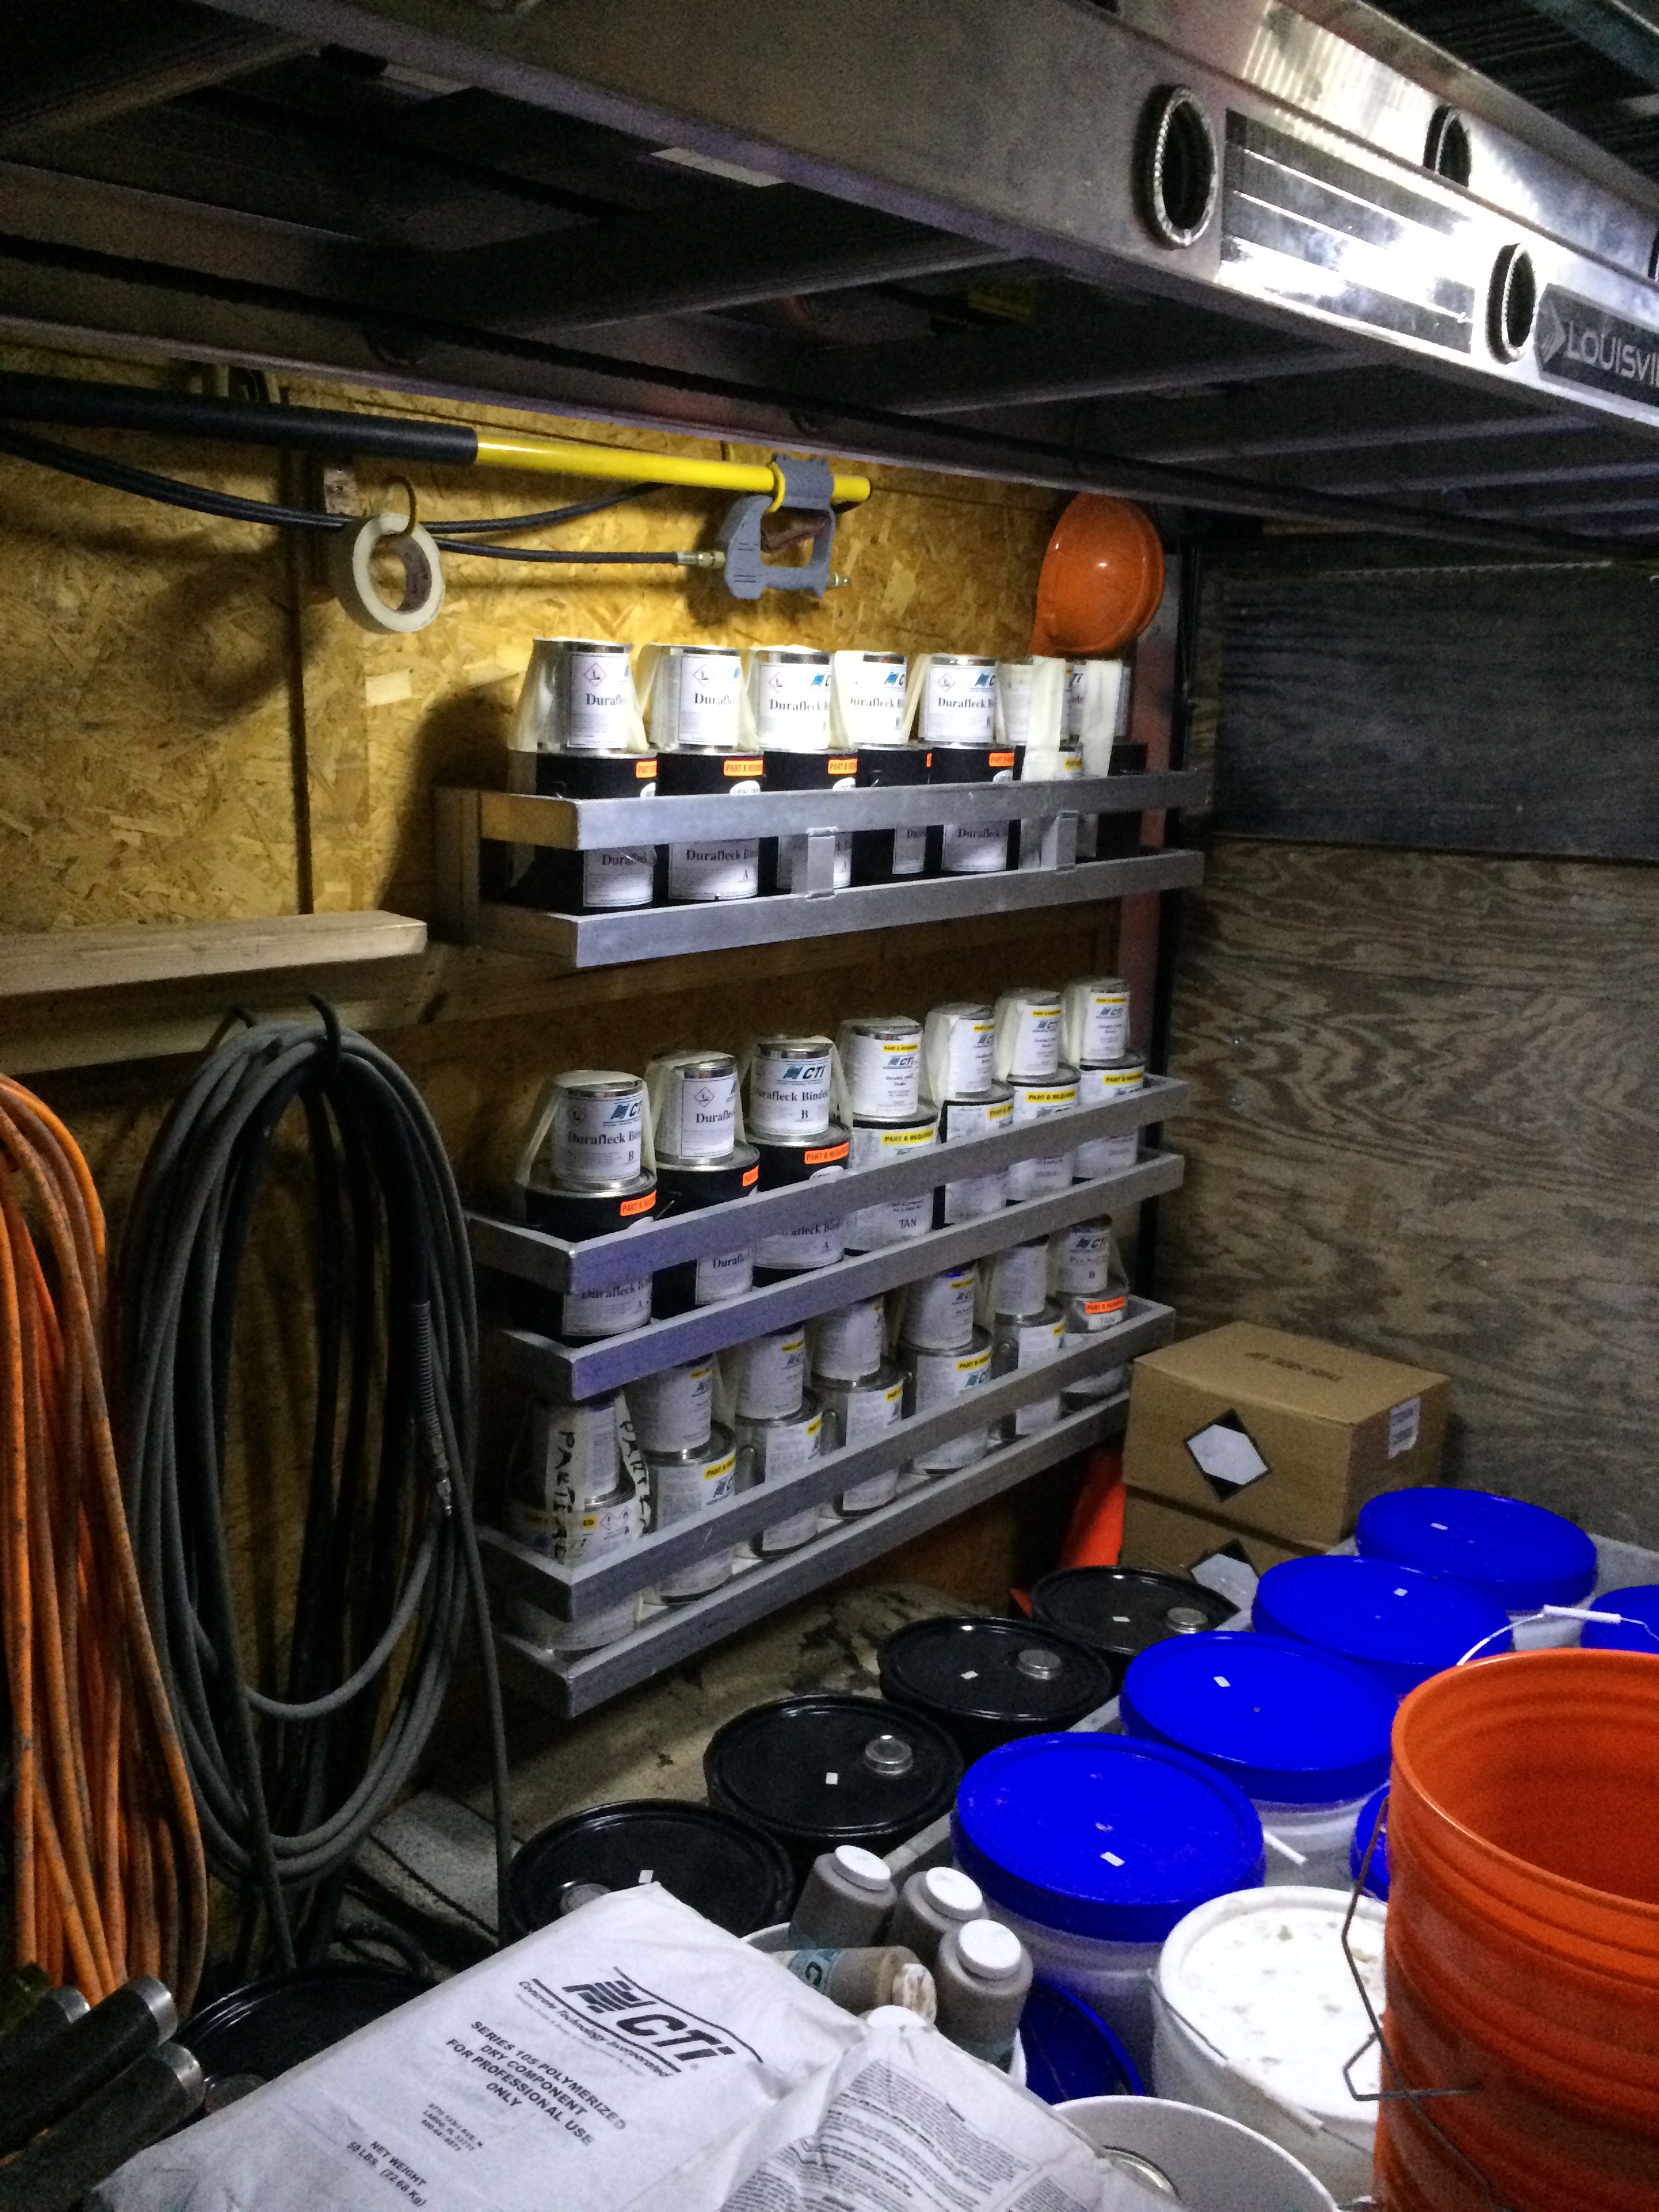
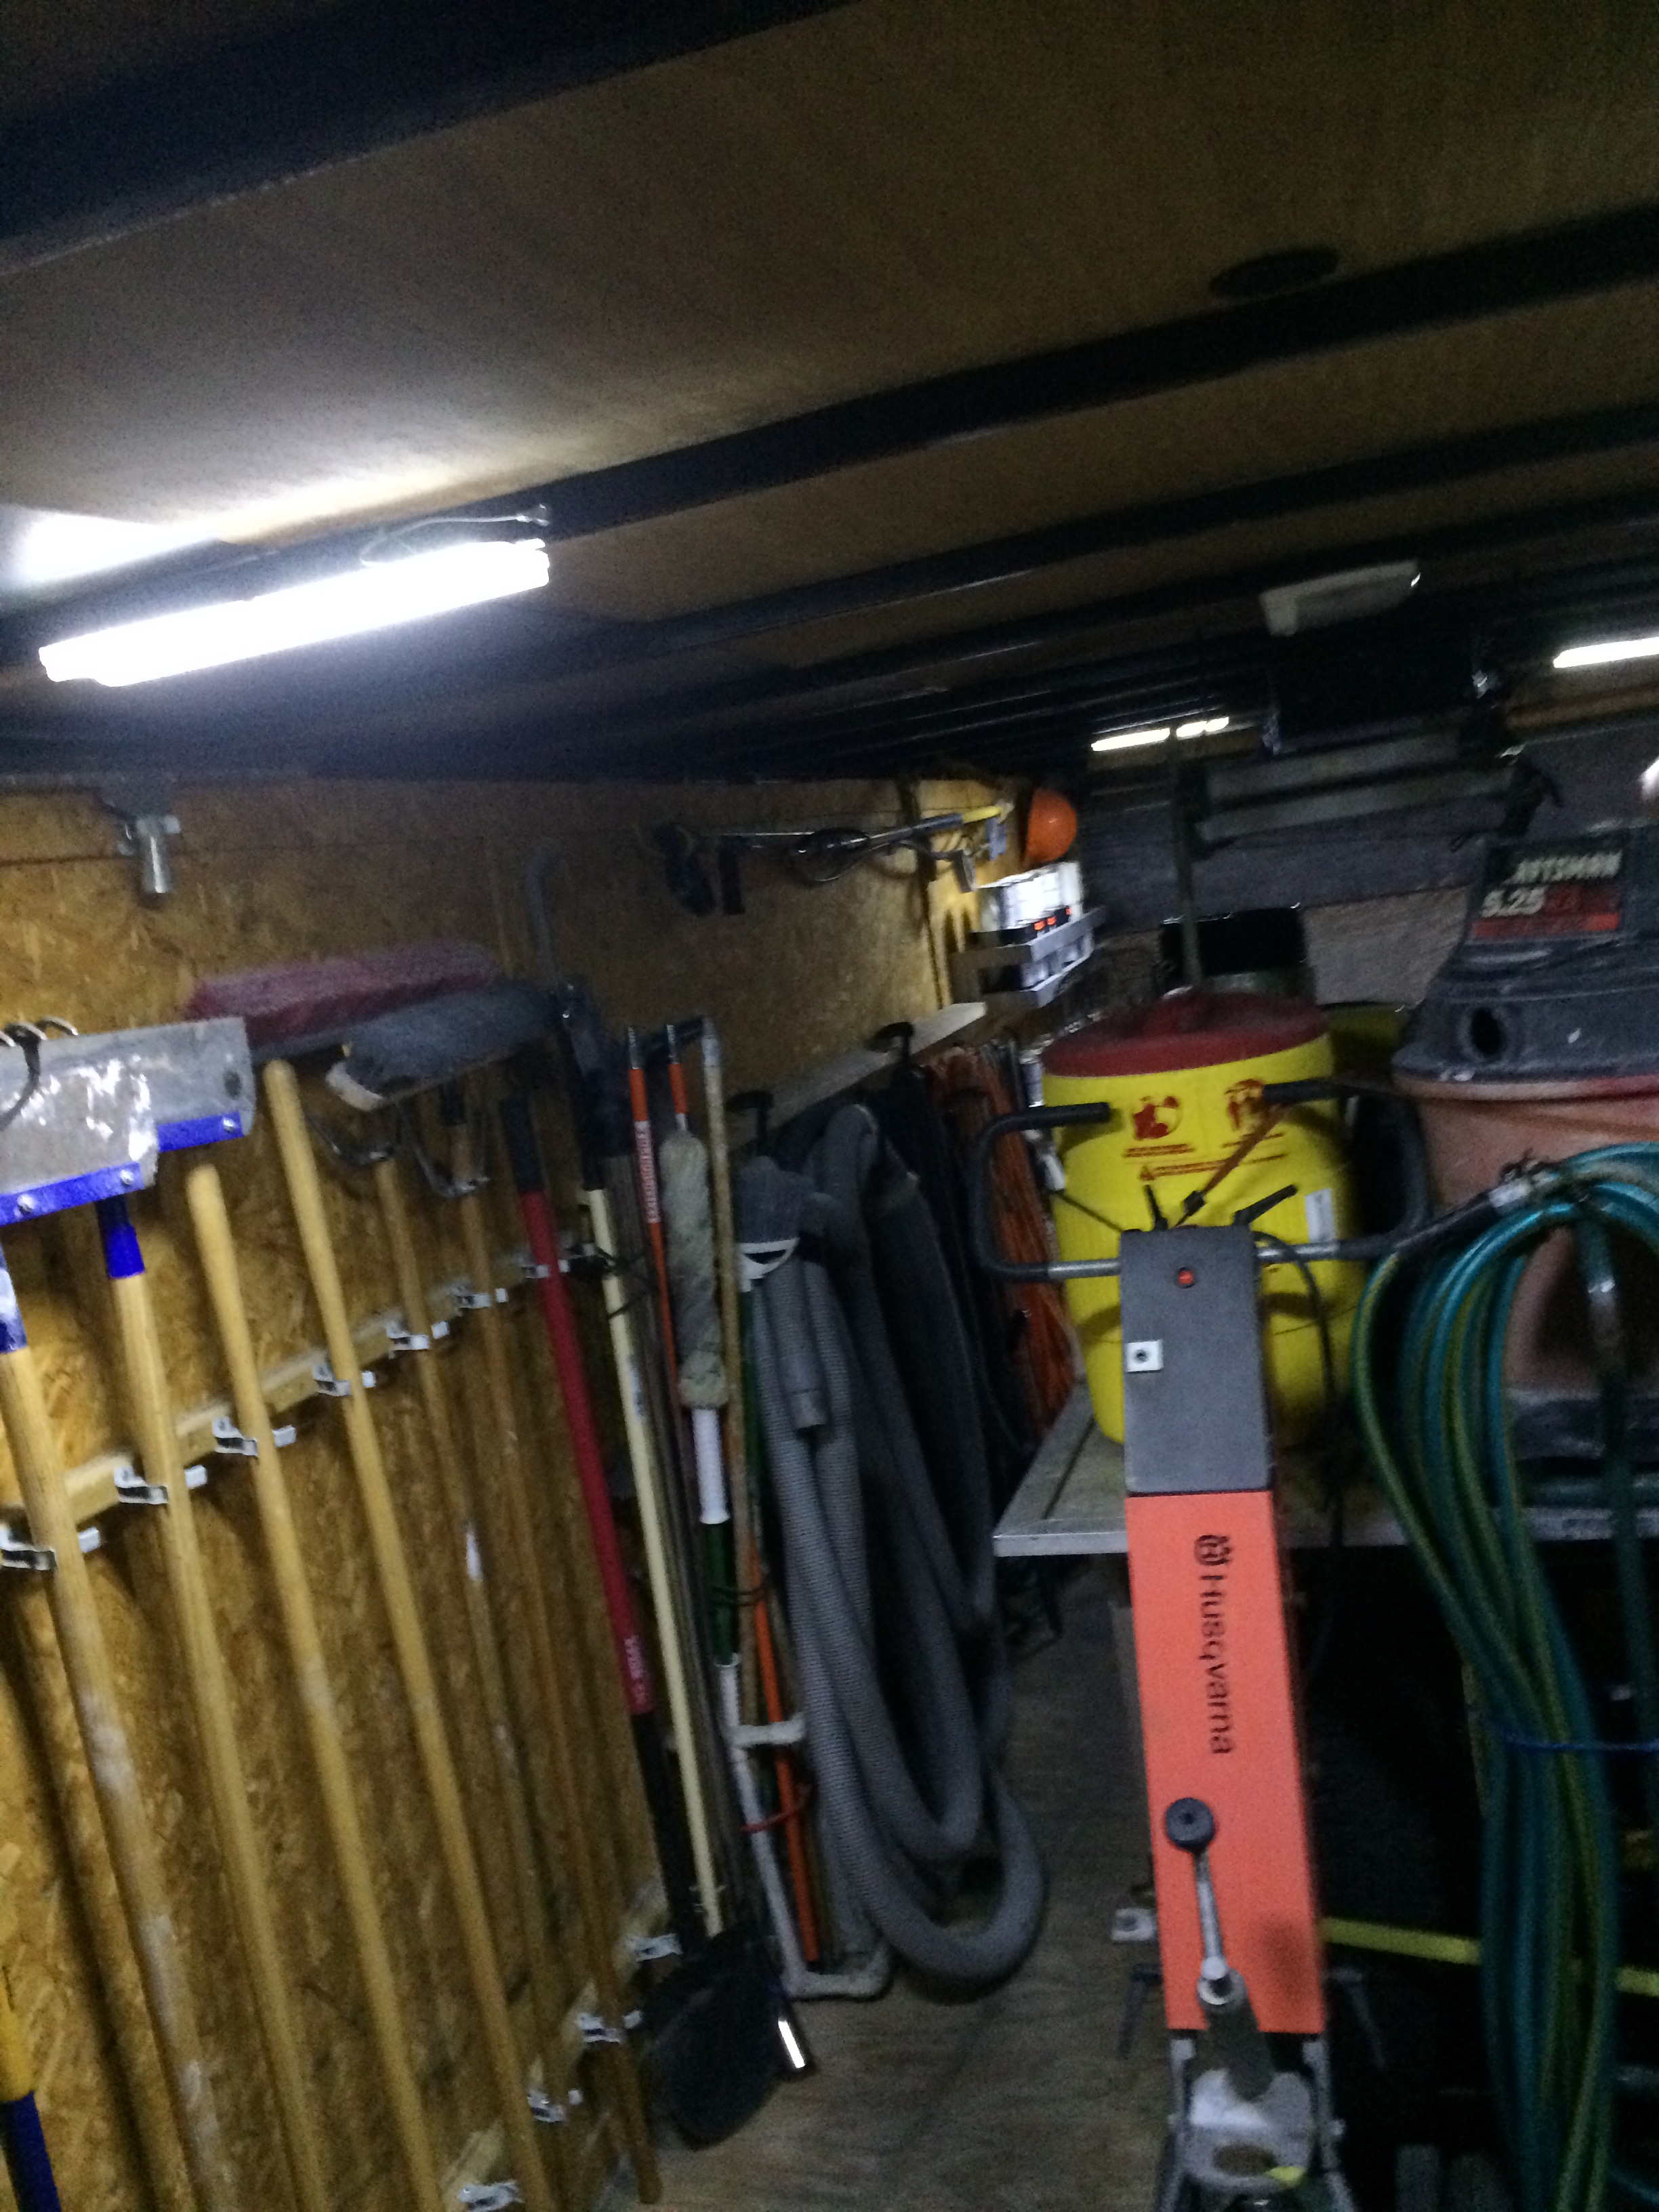
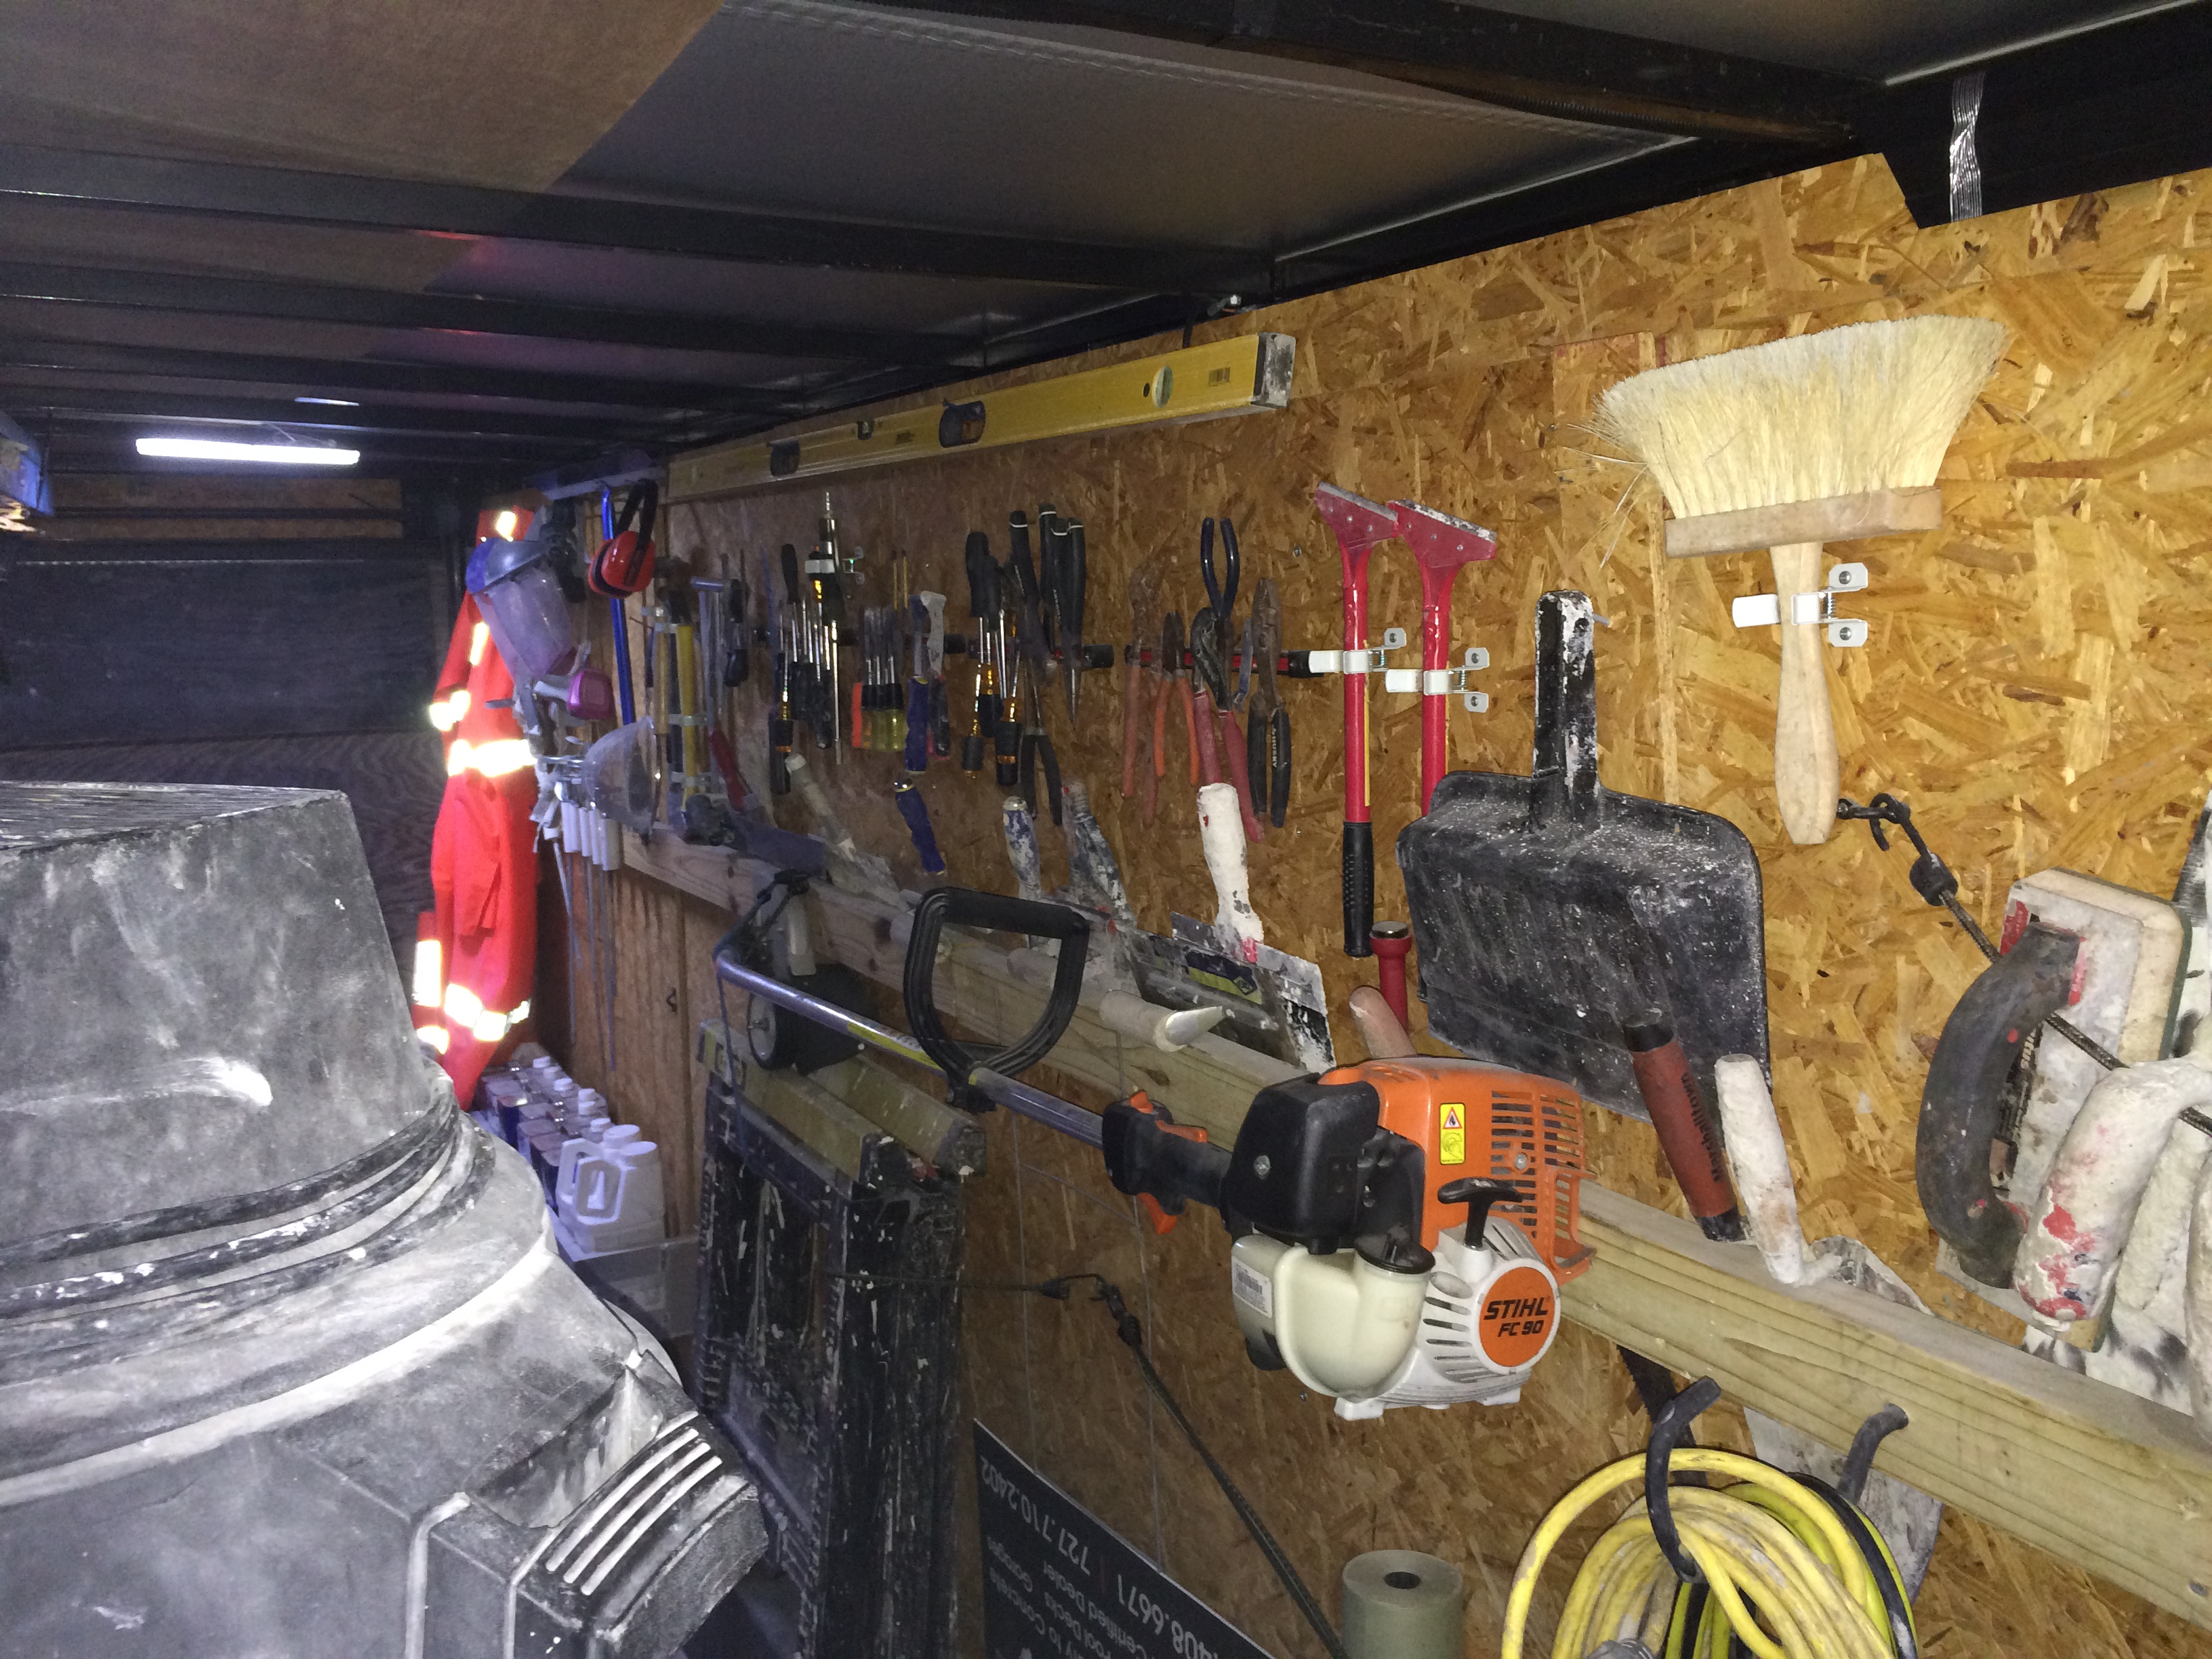
Trailer Organization
Most Dealers operate from a 7’ X 14’ tandem axle trailer. The weight limit on a trailer of this nature normally ranges from 5000 to 7500 lbs. and can easily hold everything needed for a project of up to 2000 sq. ft.
Having the trailer organized in a way where all items are easy to access and laid out in an order where they are grouped together as needed is a way to make your crew more efficient. Before the start of any project, go through the checklist of items that could possibly be needed on the project and make sure the trailer is stocked completely before leaving for the job site. This extra time spent organizing everything you need will save trips back to your warehouse (or worst, having to purchase items you already have) due to not having items while on the job site.
Trailer Organization
Keeping your trailer organized not only allows you and your installation crews to be more efficient, but also helps in keeping your CTi products in good condition, extends the life of your equipment and provides a professional look for your current and prospective customers when you’re on the job site. Below are some examples of how to organize a typical trailer, CTi recommends you build out your trailer with the storage and organizational layout that works best for you.
CTi has detailed layouts on where to keep your material, equipment and other items needed for the job site organized in a way where it is not only easy to access but also is easy to find.

At CTi, we teach advertising success comes from adhering to marketing’s 3 M’s, message, market and media. The 3 M’s help any business identify how to tweak their advertising and marketing plan to generate more of the right type of business for their Dealership.
Message – This is what you’re telling the customer in your advertising and marketing. The more specifically you can address the customer’s needs with your services, the greater the connection will be with the customer. This is sometimes hard to do with small businesses as they try to be all things to all people and the message gets so watered down the customer isn’t sure what the company does. Some of the best CTi Dealers in the network concentrate on specific market niches and hone their message with the customer until it’s razor sharp.
Market – Market is who you are trying to reach with your message. Again, we teach CTi Dealers to imagine who their ideal customer is, their age, the type of home or business their in, the types of issues they want remedied all leads to a better understanding of who your market is. Once you’ve got this nailed down, then it’s just a matter of identifying where those customers are in your area. Where are the type of homes you imagined when you thought about your ideal customer? Where are the customers located that have concrete areas around their home that may to 5-10 years old and thus in dire need of CTi’s services? This is how you nail down the market within the 3 M’s.
Media – Once you have the message and market elements figured out, then it’s a matter of figuring out the ideal way of getting the message to the market. Your delivery method may be online through your website or other home service portals such as Home Advisor, it may be in more traditional marketing through magazine or direct mail, or it may be a matter of getting the neighbors talking to each other once you have a couple of jobs down in a neighborhood by handing out flyers to everyone in the neighborhood. Measuring your advertising and marketing effectiveness is key here so you have a better understanding of how your customers are seeing your message.
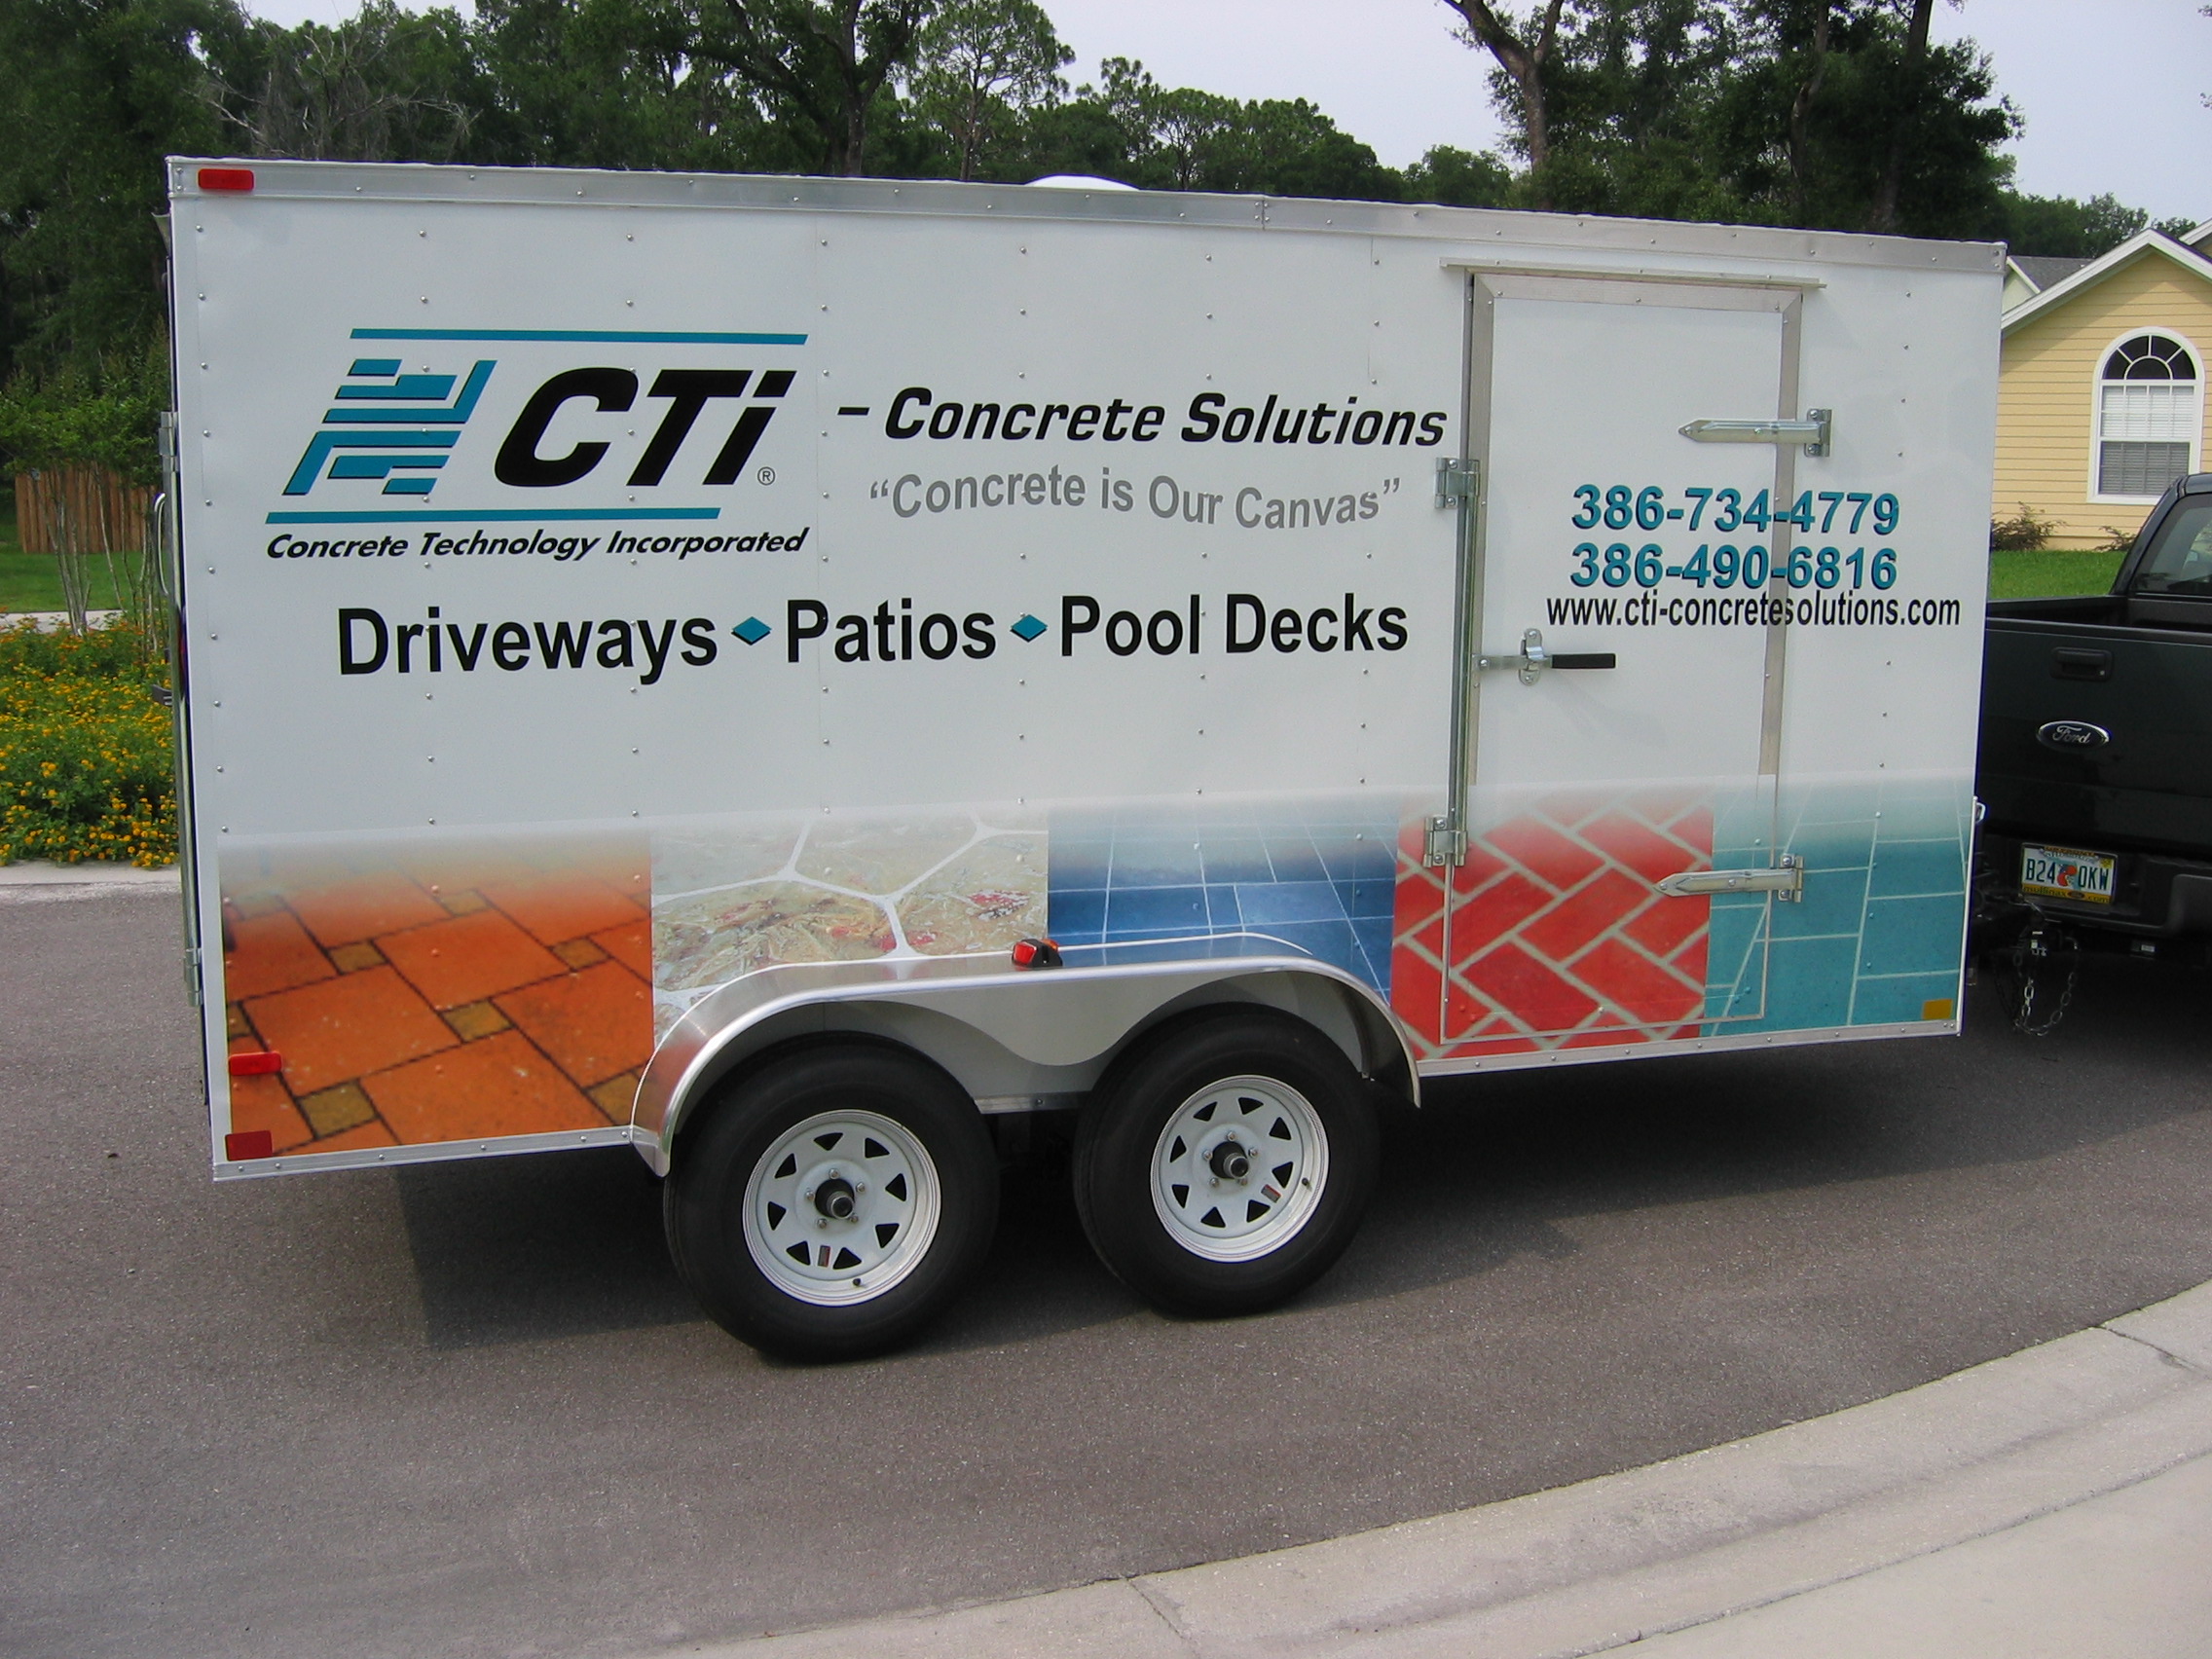
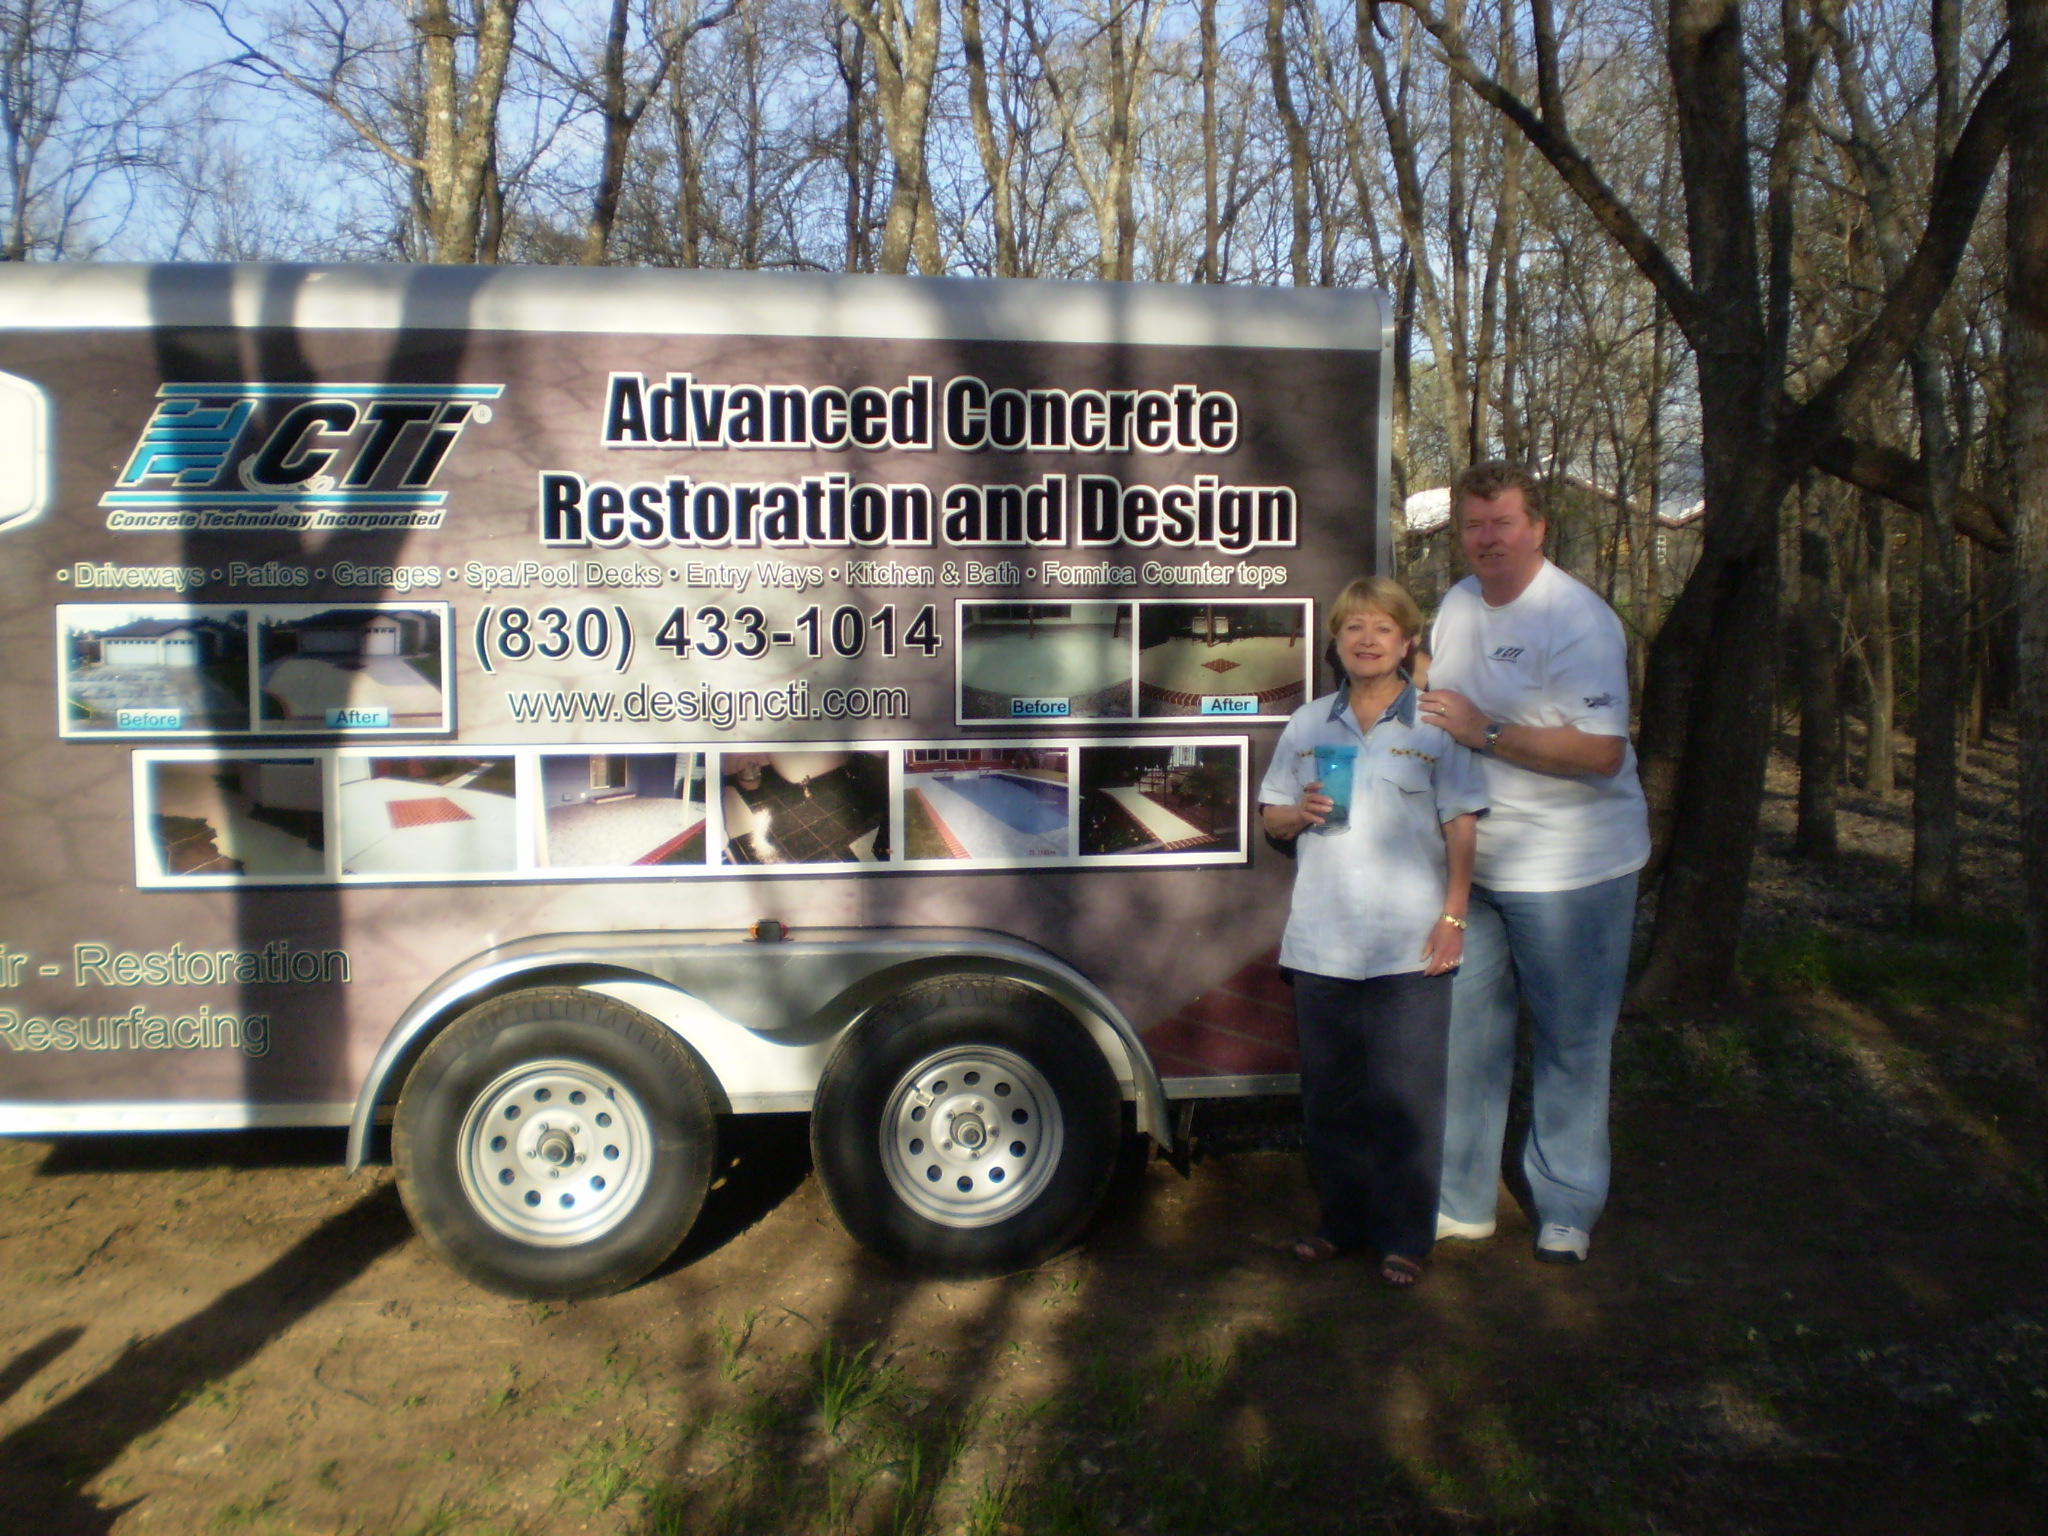
One of the more effective ways of not only generating calls for your Dealership, but also branding your business is using a trailer wrap or truck lettering. These travelling billboards provide a great way to introduce your products to new customers as you make your way to job sites and other appointments, but you can also target the advertising since you’re normally travelling to areas where your current customers are located.
Referral business is one of the keys to moving your Dealership to a new level, and having your trucks and trailers wrapped or lettered provides a great way for customers to know who to call when they see your work. Below are a couple of examples of CTi Dealers and their travelling billboards.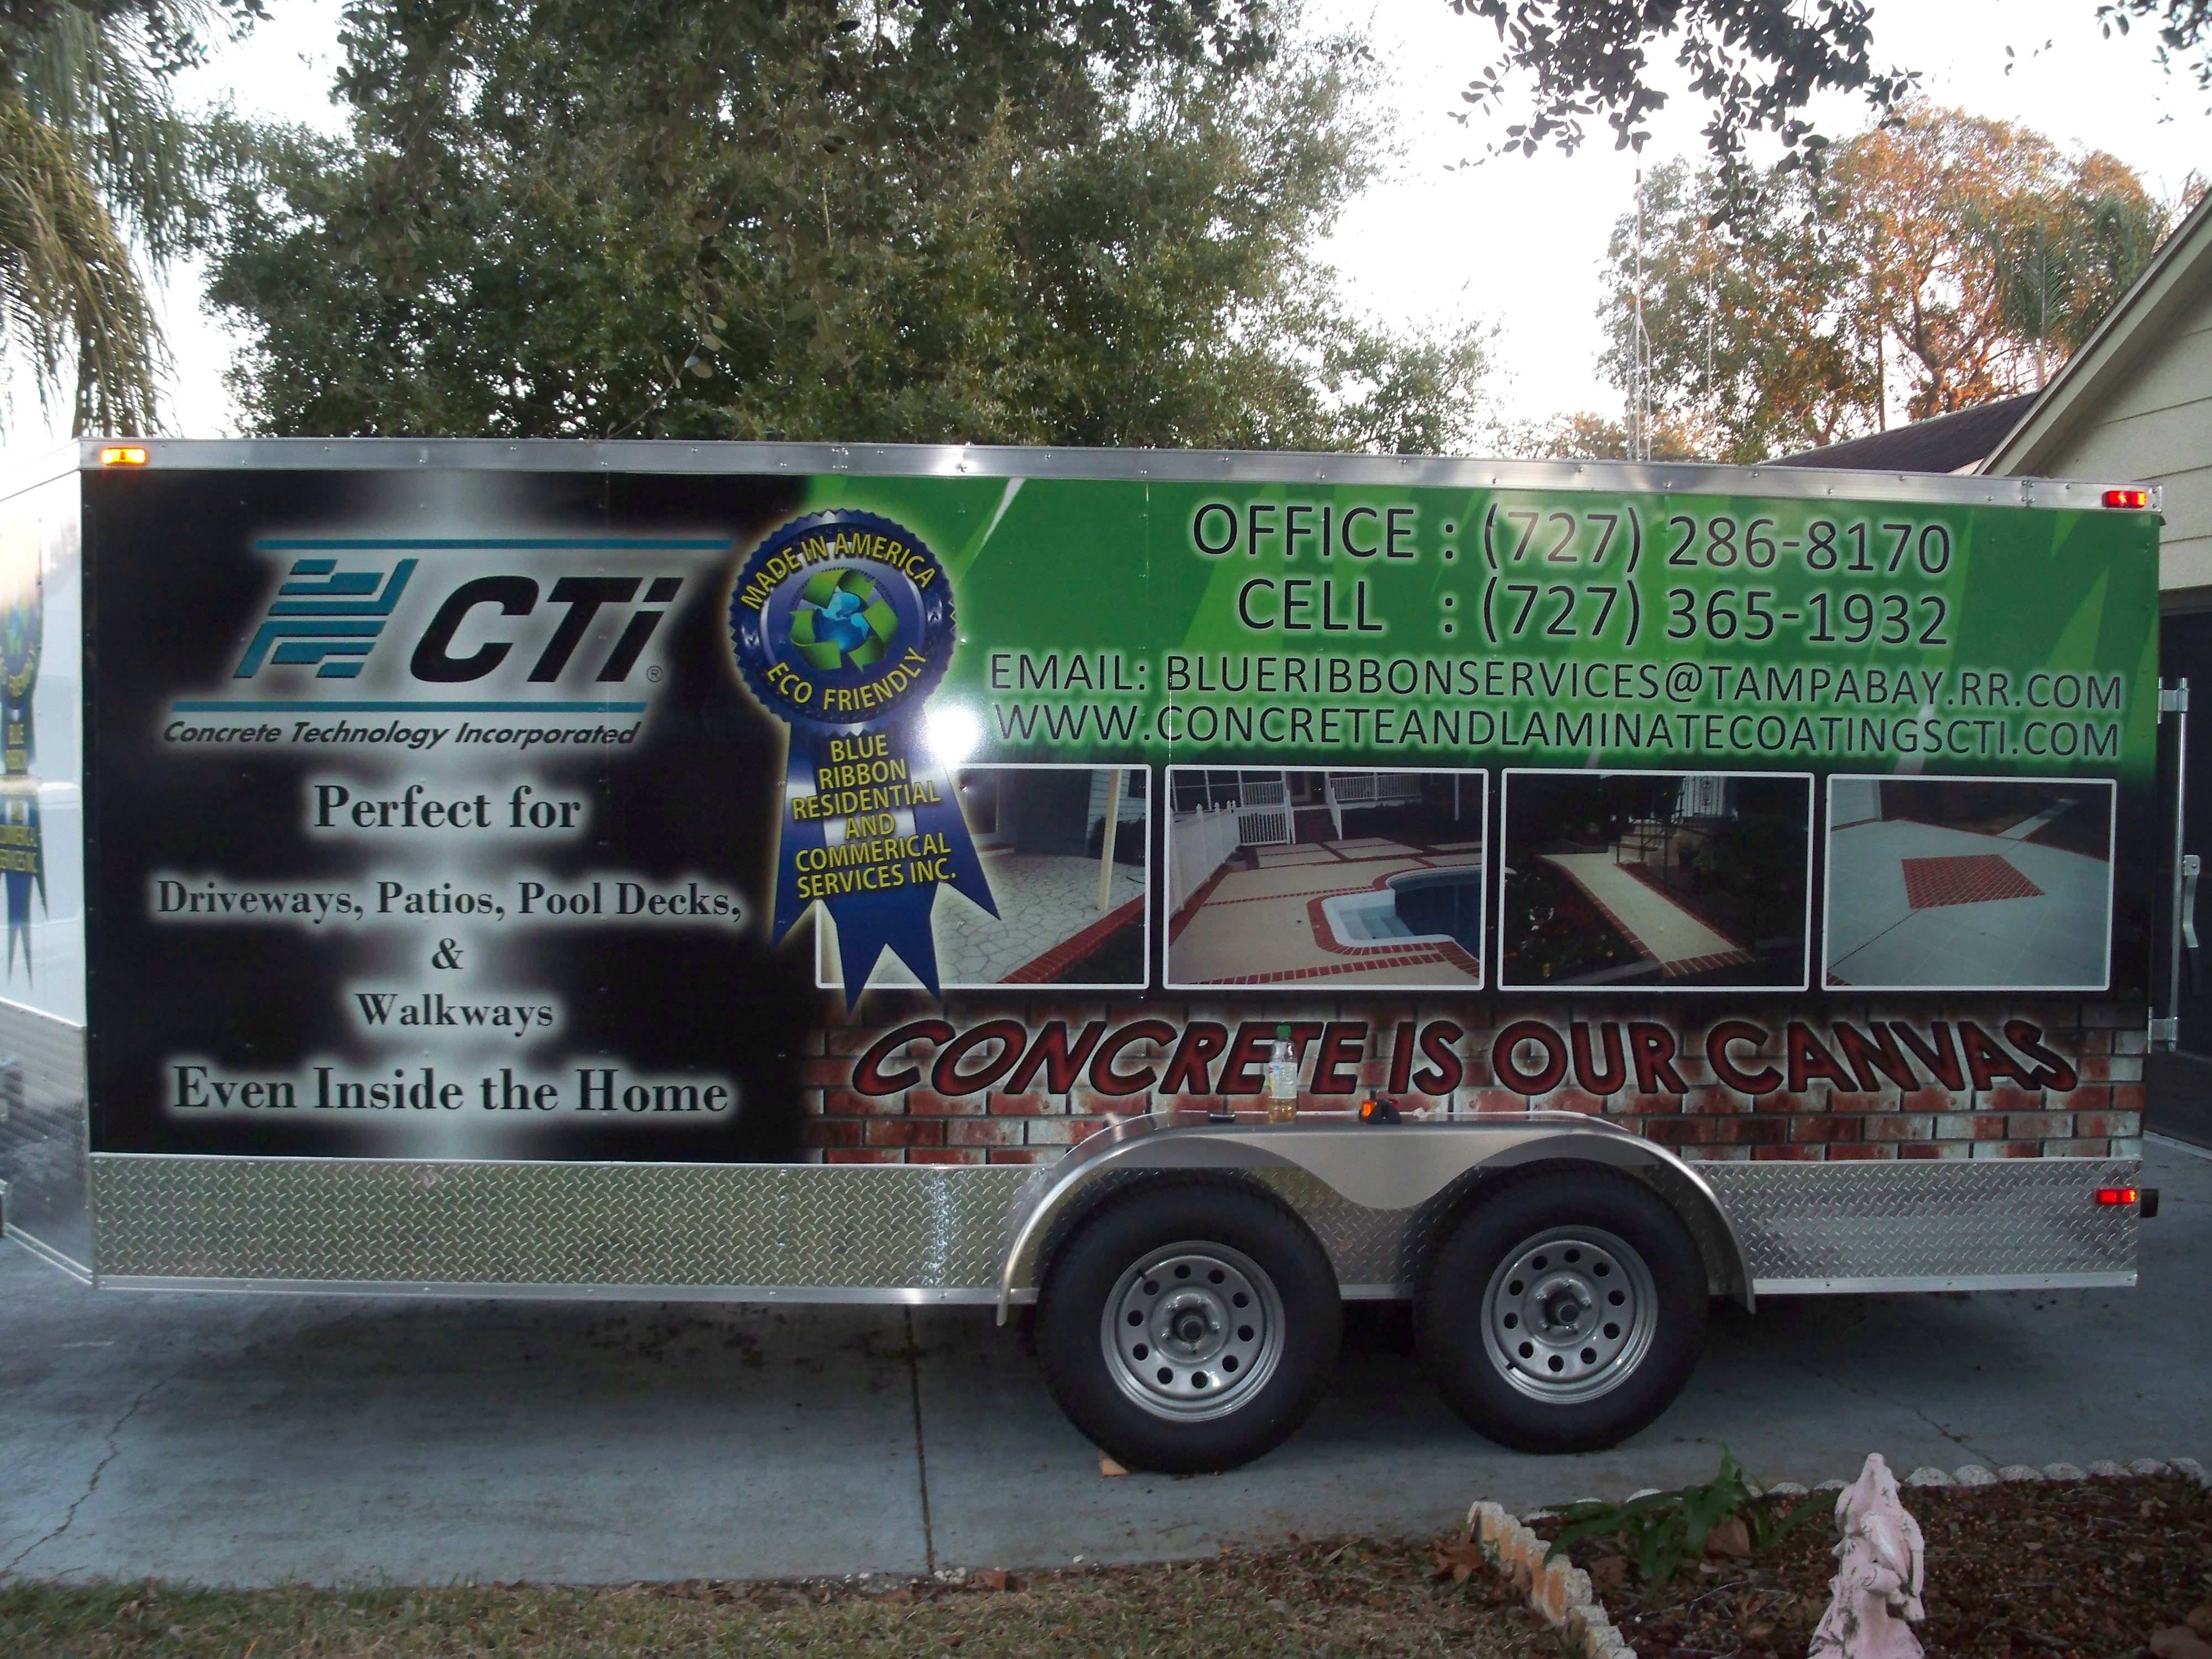
OLYMPUS DIGITAL CAMERA
When considering success factors for a new business, home services offer five potent reasons that lead to a successful venture:
- Home Services area high touch type business where dealing with the customer cannot be replaced by online or automated systems. Over the last 20 years, we’ve seen a number of industries turned inside out through automation and other machine led replacements. Home Services always needs a person to person interaction and people to complete the work.
- Dual income households is providing two factors that create more success for Home Services. First, over 60% of the households in the U.S. are now dual income. Many of these households have new levels of discretionary income but with leisure time at a premium, the second factor helps Home Services; namely, these households don’t want to spend their time on sprucing up the home and would rather pay someone to do it for them.
- Home Service businesses provide a low overhead business model in most cases. Most of these type businesses can be operated from home of a small warehouse/office setup.
- The market is large and relatively stable. Home ownership provides a huge market in almost every area of the United States. In addition, home ownership has remained relatively stable across the nation and will provide a growing market for years to come.
- Expansion of the business is relatively easy. In a brick and mortar establishment, larger spaces and increased rent is the only way to increase traffic and revenue. In a Home Services business, adding additional production can be as simple as adding a helper to a current crew and is normally no harder than adding an additional crew with the equipment, vehicle, etc. needed to support them. In either case it is easier from a management as well as cash flow position to expand the business.